
 Blog Php Speeding up e-commerce content moderation with Machine Learning based on Amazon Web Services
Speeding up e-commerce content moderation with Machine Learning based on Amazon Web Services
Machine learning (ML) has gone mainstream. The use of this technology – a consequence of AI development – is becoming more and more common in the world of business. Self-learning systems are ideally suited to analyzing large volumes data and making predictions.

Table of contents
Machine learning is used, for instance, for better product recommendations and better personalized contact with customers, as well as for analyzing user behaviors or user-created content. What’s more, it supports decision making thanks to data visualization. Before long, machine-learned systems will be employed in all kinds of business, from services to industry, creating advances from which there is no going back.
At Boldare, we’ve already had the chance to apply machine learning in the context of content moderation, preparing a complex solution for one of our clients. How did it go? Read on to find out.
The problem: content moderation
Nobody really likes manual moderation. It’s a very repetitive and quite tedious activity, requiring a system administrator to accept or reject:
- forum posts,
- profile pictures,
- personal data,
- and many, many other forms of content.
In small-scale IT systems involving a smaller number of users or products this process may not be so tiresome, but as every business aims to expand, it can quickly become a serious challenge for a growing company. Sometimes a single moderator may not be enough, so more people get engaged in the process, which in turn generates more cost. In fact, the very act of moderation is just a quick evaluation of a given piece of content, something quite trivial and almost mechanical for the moderator.
In such cases, it’s worth considering automation. Most issues can be detected on the level of user data validation and there are many ways to accelerate the process of moderation.
For example, profile picture moderation regarding the occurrence of faces with correct proportions, with no glasses and hats, can be done by means of a face validator. There are also dedicated SaaS solutions that will detect offensive content. However, the problem gets more complicated when a less structured sort of content must be moderated, e.g. new user data. In this situation, machine learning algorithms provide an answer.

Our client’s needs
In one of our current long-term projects, consisting of the creation and maintenance of an integrated system for tire wholesalers and workshops, our client has faced an ongoing issue of moderation relating to new products added to the system by wholesalers.
When carried out by an administrator, the process is painstaking and time-consuming and the verification of the product (e.g. a tire, a rim, or a chain) cannot be programmed as a classic validator. Product data contains a lot of special fields, various codes, descriptions, and technical parameters, so only an expert is able identify whether it’s right or wrong. Frequently, some parameters influence the correctness of others, for example, the loudness rate may determine if the name of the tire is correct. There are plenty of cases like this and the logic behind it cannot be reproduced using ordinary algorithms.
After consulting our client, we decided to implement a solution which would collect data concerning the products and the results of manual moderation in an external database. This data would then be used to train a machine learning model and create a prediction mechanism which could express in percentage terms the probability of the data correctness of an unverified product. In the final stage, having confirmed the compatibility of the predictions with reality, we would be able to define the minimum level of probability, allowing fully automated moderation.
Technologies
The app itself is written in PHP, using the Symfony2 framework (2.8 LTS is the current version). The database is PostgreSQL (formerly MySQL); and asynchronous processing, employing the Beanstalkd queuing system, was also used. We planned to reach our goal with minimum workload, reducing the costs of creating and maintaining the solution.
The use of an already implemented system of queuing, for both the data collection and fetching prediction results, meant that we would not slow the app down in any way.
Data collection
To gather the data, we used DynamoDB, which was filled with product data during manual moderation. It’s a NoSQL from Amazon, extremely efficient and easily scalable. Even though to obtain satisfactory productivity when it comes to complex queries, it’s necessary to create dedicated (paid) indexes on the fields, the system was a rational choice that suited our needs.
We implemented product data transfer to the external database in an asynchronous way. When an unverified product was accepted, rejected, removed, or edited (in the case of insignificant data errors, the admin can edit the product manually and then accept it) its identifier was added to the queue. The queue consumer downloaded its data from the database and sent it along with the moderation result to DynamoDB, using the SDK provided by Amazon.
Thanks to this approach, data collection did not significantly affect the speed of the app, in particular moderation. In the case of increased traffic in the app– for instance, the beginning of the tire-changing season – the consumer can be temporarily switched off to reduce the load on the database. It is also easily scalable, e.g. by setting a selected number of processes in Supervisor. This, however, turned out to be unnecessary, as the efficiency of the single process was sufficient for simple data transfer to DynamoDB.
Pro-Tip: We used dynamic scaling in our DynamoDB tables. It was a very useful solution for us, because we needed a high record capacity in the process of data collection, but that was no longer important during data export and the capacity of table reading had to be increased.
Target data format
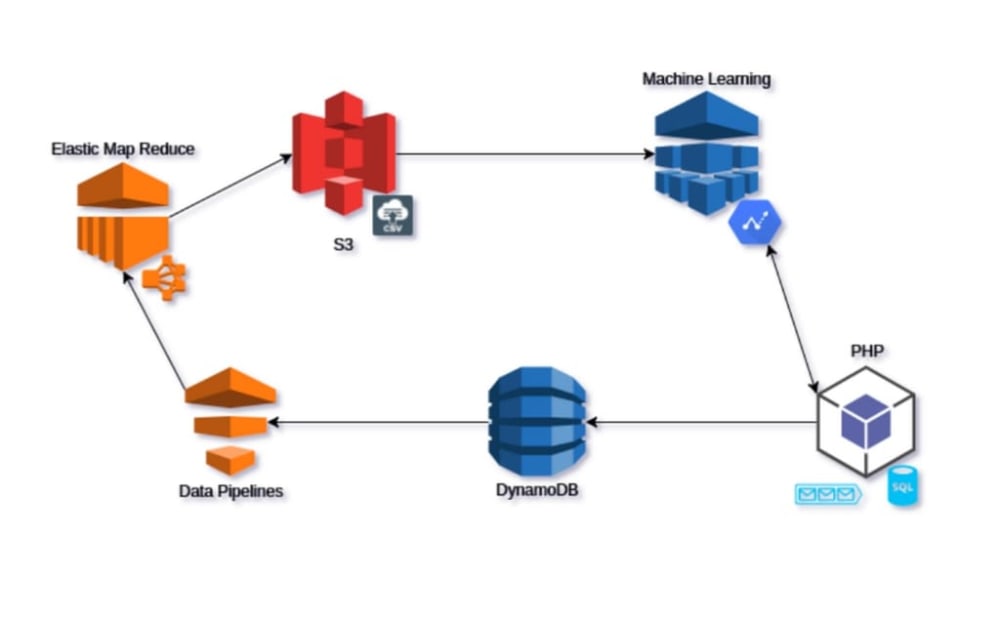
Amazon Machine Learning accepts two data formats when creating the so-called datasource: data saved in the Redshift data warehouse and CSV files previously exported to Amazon S3 storage. Due to the fact that the data warehouse was not a cost-efficient solution as far as the scale of our app was concerned, we chose the other format.
It turned out that exporting data from DynamoDB to CSV is quite complicated. One way out was to implement it ourselves, but that didn’t seem too efficient. We could also use the ETL Amazon Glue service, but we decided on Amazon Data Pipelines, which also enabled us to set the schedule of data dumping from DynamoDB. There is no need for real-time data used in the ML model; using historical data in a proper scale doesn’t have any particular impact on prediction effectiveness. That’s why exporting data to CSV once every couple of days was just fine and helped us save on resources.
The pipeline we configured operates on another service delivered by Amazon – Elastic Map Reduce – which is an extension to the Apache Hadoop framework (it’s possible to use other frameworks too, though). When starting the process, a new EMR cluster of the required size is set ad hoc, which can parallelize the process of data exporting.
Internally, a cluster like that uses Apache Hive for queries in the HiveQL language, similar to SQL, which makes it possible to both access and process the data from DynamoDB as well as to save as CSV on Amazon S3. This software stack allows working on a large set of data, just like the one containing our products.
This is a sample HiveQL query exporting the contents of a table in DynamoDB to a CSV file on S3:
CREATE EXTERNAL TABLE ddb_my_table (first_column boolean, second_column string) STORED BY 'org.apache.hadoop.hive.dynamodb.DynamoDBStorageHandler'
TBLPROPERTIES (
"dynamodb.table.name"="#{input.tableName}",
"dynamodb.column.mapping"="first_column:first_column, second_column:second_column"
);
DROP TABLE IF EXISTS s3_my_table; CREATE TABLE s3_my_table (first_column boolean, second_column string) ROW FORMAT SERDE 'org.apache.hadoop.hive.serde2.OpenCSVSerde' LOCATION '#{output.directoryPath}'; INSERT OVERWRITE TABLE s3_my_table
SELECT * FROM (
SELECT '1st_column_header' AS first_column, ‘2nd_column_header’ AS second_column
UNION ALL
SELECT CAST(first_column AS string) AS first_column, second_column
FROM ddb_my_table
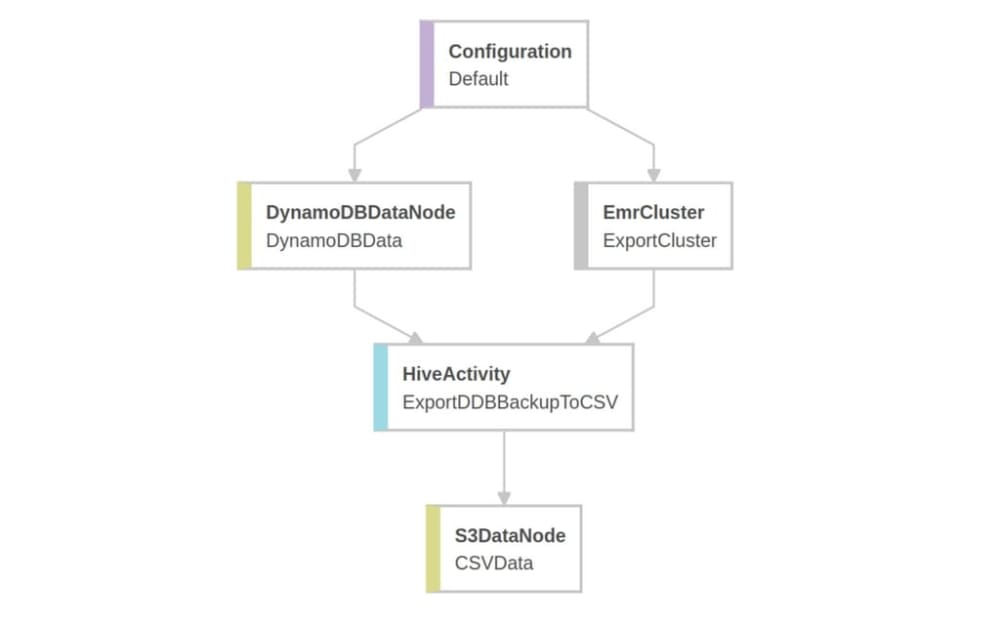
) res;In the first part of the query, the “ddb_my_table” is created in Hive, indicating a DynamoDB table configured in the DynamoDBData element. It is necessary to manually define the columns and their types and to manually set the mapping between the Hive and Dynamo tables.
The next stage is to create the “s3_my_table” corresponding to the CSV file which is going to be created on S3. Unfortunately, the OpenSCVSerde driver (“Serde” is an acronym of SERialize and DEserialize) has many flaws, and one of them is the lack of support for column names in CSV files, which is available in Amazon Machine Learning’s datasources. This is why we came up with the idea of using the UNION ALL expression and putting the column names in the first file line. Another limitation which proved quite problematic is the lack of support for any type other than string, which requires mapping all the columns on the string type by use of the CAST expression.
Pro-Tip: In the case of array columns, the CONCAT_WS() function may be of use.
We placed the query in a HiveActivity element as HiveScript and so, after configuring the cluster, the element representing the DynamoDB table, and the CSV file, we were able to execute the pipeline and the data appeared on S3 after no more than an hour.
The model
Before creating the model, it was necessary to configure a new datasource.
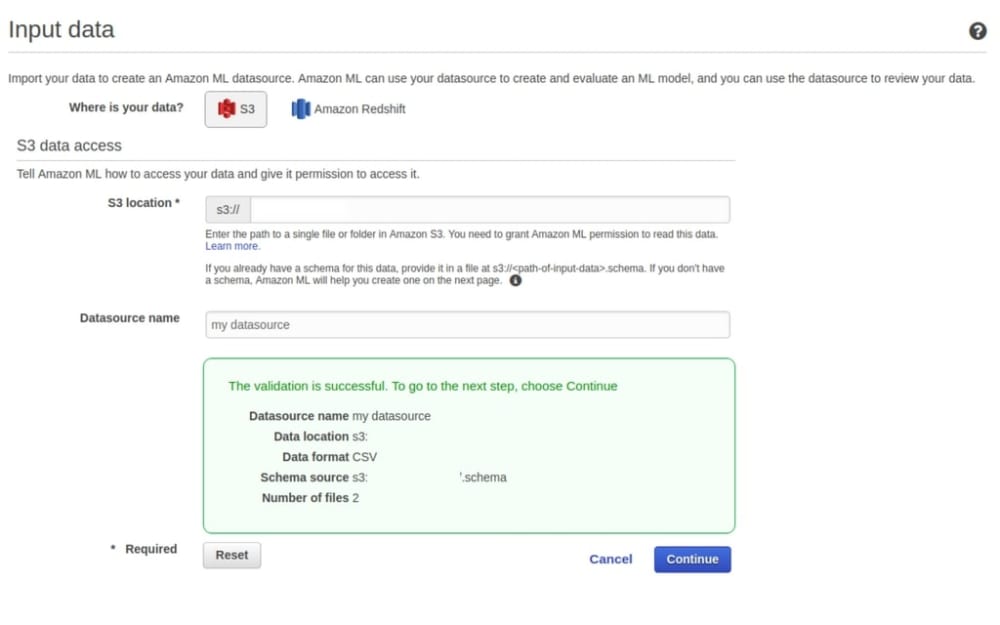
After indicating the bucket where the data was saved and selecting the “Verify” option, we were informed that the files were correct. Remember that Amazon Machine Learning only accepts data formats where columns are separated by commas, records by new lines, and values containing a comma should be included in double quotation marks.
The next step was the configuration of the datasource. The data types (binary, categorical, numeric, or text) for features should be selected.
Pro-Tip: Remember that not all kinds of data that can be expressed in numbers should be tagged as “numeric”: the number of the day of the week or a producer ID are good examples of features which should be classified as “categorical” even though they are represented by numbers.
Having chosen the types for every feature, you must decide which column is a label, i.e. a column whose value is eventually going to be the prediction result. Next – optionally – you can pick a column containing a unique record identifier.
When you’ve confirmed the configuration, the datasource is created and the first statistics are calculated. Additionally, any text values are split into tokens and analyzed. The data will also be scanned for missing or incorrect values.
Pro-Tip: If you’ve gone through the process of datasource configuration for the first time, it’s a good idea to save the generated JSON metadata (“View input schema”) in a .schema file in a catalogue with the CSV files. This way, the following imports will not require manual setting of the feature types, label, and identifier.
When the datasource is correctly created, you can configure a machine learning model based on it. Choose the datasource and the model and evaluation name. In the beginning, you can use the default settings for the algorithm of training and evaluation: random data split into 70% training data and 30% data used to evaluate the effectiveness of the model, and several others. If you find these settings insufficient, try your own configuration.
Depending on the column type selected as a label (target), an adequate learning algorithm will be matched: logistic regression for binary values, multinomial logistic regression for multiclass classification (categorical values), and linear regression for numeric values.
After configuring and training the model, you can have a look at the evaluation and, if necessary, improve the quality of data. If you don’t find anything wrong with the evaluation, you can start generating first predictions.
Predictions
Amazon provides the possibility of predicting the value of the target attribute (label) for a particular observation (feature set) in two ways:
• larger batches for the data gathered in the CSV format on Amazon S3,
• real-time predictions via the REST endpoint for single observations.
In our case, the prediction data should have initially been sent for all the unverified products, so that later on only individual products would need to fetch the result. For this reason, we decided to use real-time endpoints.
Owing to the fact that Amazon charges both for the number of observations sent to the endpoint and for the time of its operation, our implementation was based on creating a real-time endpoint in the cron task, sending the data of all the products queued in Beanstalkd, saving the prediction results in the PostgreSQL database, and finally removing the created endpoint. All the operations on the prediction endpoint can be realized through the Amazon Machine Learning REST API .
If we decided to use the batch predictions, we would have to – just as in the case of datasources for the ML model – prepare CSV files of appropriate format and send them to Amazon S3. Generating the prediction results is then asynchronous, which is a convenient solution in the case of a large number of observations. However, the real-time endpoint was sufficient for our needs.
Results and plans for the future
Currently, we’re going to release the solution in production environment. Data collection will likely take many weeks and as soon as we have a sufficient amount of data, we’ll be able to evaluate the effectiveness of the predictions and, if necessary, improve their quality.
The results were pretty promising during the development environment testing, but we had difficulties with collecting data about incorrect products. This was caused by the fact that in the app, all the rejected products are removed from the system, so historical data is missing that could have been used to create a better datasource.
The current implementation serves only to present the prediction results to the admin and is focused on data gathering and model training. In the future, if predictions reach a satisfactory level of accuracy, we’re planning to extend our solution by automatic acceptance of correct products.
The technology stack that we used will also serve us in future implementations of machine learning in the new apps that we create.
Share this article: