Differences between .class and .dex files in Java & Android
Several months ago, my adventure with creating mobile apps for Android began. Today, I’d like to tell you about the difference between .class files in Java and .dex files in Android. I’ll also show you how to create a .dex file containing a Java class step by step.

Table of contents
Why is this so important?
At first sight, it might seem that Android and Java are exactly the same, but when you delve deeper into them, it turns out that Android is a completely distinct type of architecture, with different low-level operations, different file structures, and many others. And does the knowledge of those differences influence a programmer’s work? It certainly has a direct impact in Android, where you have to pay attention to the optimization of code during programming from the very beginning, whereas in large apps it is important to use external libraries in Android. In the article below, I’m going to tell you why.
Bytecode - a set of instructions
Each Java class is compiled into Java bytecode. As a result, a .class file is created; Java bytecode which is a set of instructions for the Java virtual machine. There are 256 instructions: out of those, 198 are in fact used, 54 are reserved to be used in the future, and 3 are considered as permanently non-implemented. The instructions for JVM are commonly referred to as opcode (operation code). Each instruction takes 1 byte of memory, in special cases 2.
JVM vs. DVM - what’s the difference?
To let you better understand the differences between JVM (Java Virtual Machine) and DVM (Dalvik Virtual Machine) in Android, I will describe in a nutshell what happens after .java files are compiled to bytecode in JVM and DVM.
In JVM, .java class files are compiled to separate .class files, one file for each class. No matter whether the class is public, private, or static. During work, JVM dynamically reads in bytecode to each .class file in case the class is required.
Meanwhile, in DVM, the bytecode of all the classes is in one .dex file (Dalvik Executable). One of the most significant differences between JVM and DVM is that DVM does not use Java bytecode but it employs its own Dalvik bytecode, i.e. a set of instructions (opcode) destined for DVM.
One of the reasons why DVM uses Dalvik bytecode is because DVM, unlike JVM, is based on a register, while JVM is based on a stack. That is why most JVM opcode instructions refer to stack-based operations, and in DVM, most instructions are related to register-based operations.
So, how does DVM use Java classes added as .jar files to an Android app? It happens because all the .class files are recompiled by means of dx (Dexer) to Dalvik bytecode, and then they are attached to the .dex file. Dexer is a standard component of the Android SDK tool kit.

How does it look in theory?
To see the differences between .class and .dex files, first you need to take a look at the structure of both types of file. Below, I have deconstructed each of the above-mentioned files. It is possible to single out the files more distinctly, however, I have decided that enough deconstruction is enough.
Figure 1: The structure of a .class file
- Descriptions of the most significant elements forming a .class file are as follows:
- Constant Pool – this is the list of constants in the class, just like constant string fields, class, field, and interface names.
- Access Flag – 2 bytes determining whether the file is a class or interface, and whether the class is final, protected, or public, etc.
- This Class – current class name field.
- SuperClass – 2 bytes indicating the superior class
- Interfaces – all the interfaces implemented by a given class.
- Field – field defined by the class file.
- Method – methods defined by the class.
- Attributes – a list of all the attributes of the class.
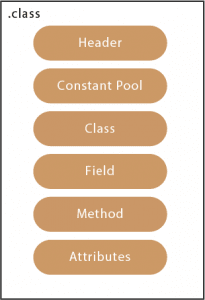
Figure 2: The structure of a .dex file
I am now going to present you the descriptions of the most significant elements forming a .dex file:
- Header – contains the basic info about the file, its size, indicators to various elements of the file.
- String_ids – a list of identifiers of all the strings used by the file.
- Type_ids – a list of identifiers of all the types included in the file (classes, boards, primitives).
- Proto_ids – a list of prototypes (structures) for file references.
- Fields – a list of field identifiers referred to in the file.
- Methods – a list of identifiers of all the methods included in the file.
- Classes – consists of 8 parts: class id, access_flags, super class type_id, interface list address, source file name string_id, class data address, address of the data initializing the static fields, address of the related annotations to the class.
- Data – a section of data; actually, previous .dex file fragments mostly refer to the addresses in this section.

How does it look in practice?
So much for theory. Now, using the example below, I will try to show you how to make four .class files referring to one class each from a .java file containing four classes (public, private, protected, and static). Next, the compiled .class files will be recompiled to a .dex file.
I created four classes in one file: MyPublicClass.java
public class MyPublicClass {
private class MyPrivateInnerClass {
}
protected class MyProtectedInnerClass {
}
public static class MyPublicStaticClass {
}
}
Then, I compiled the file to JVM bytecode using the following command: javac MyPublicClass.java
As a result, I got four .class files.
./
../
MyPublicClass.class
MyPublicClass$MyPrivateInnerClass.class
MyPublicClass$MyProtectedInnerClass.class
MyPublicClass$MyPublicStaticClass.class
Let’s see what happens after you’ve compiled the same class to an Android .dex file using Dexer. To create the .dex file, I will pack the previously created .class files to one .jar file. I will use the following command:
jar cvf MyPublicClass.jar com/test/*.class
The result is the alert below and the MyPublicClass.jar file containing the .class files.
$ jar cvf MyPublicClass.jar com/test/*.class
added manifest
adding: com/test/MyPublicClass.class(in = 768) (out= 457)(deflated 40%)
adding: com/test/MyPublicClass$MyPrivateInnerClass.class(in = 497) (out= 288)(deflated 42%)
adding: com/test/MyPublicClass$MyProtectedInnerClass.class(in = 513) (out= 295)(deflated 42%)
adding: com/test/MyPublicClass$MyPublicStaticClass.class(in = 406) (out= 251)(deflated 38%)
As soon as I have the .jar file, I can start creating the .dex file. Using Dexer, I compile the MyPublicClass.jar file to MyPublicClass.dex file. I use the following command:
./dx –dex –output=MyPublicClass.dex /home/grzegorz/MyPublicClass.jar
In result, I get the MyPublicClass.dex file containing exactly four Java classes compiled to DVM bytecode.
./
../
MyPublicClass.dex
dex file limit
A popular error alert in Android goes as follows:
trouble writing output:
Too many field references: 131000; max is 65536.
You may try using –multi-dex option.
What does it mean? It means that your .dex file contains too much code and that you should check whether the imported libraries are redundant – if they are, remove them. Another solution is to separate the code into multiple .dex files, so called “multidex”. This operation may have certain side effects, such as:
- Application Not Responding (ANR), i.e. a temporary stoppage of the application caused by reading in .dex files that are too large.
- Applications based on multidex may be unable to work with systems lower than Android 4.0 (API level 14).
In this article, I wished to show you the differences between the structures of .class and .dex files in Java and Android. A programmer coding in one of these environments may not need to remember about these structures. However, there are cases when this knowledge proves useful, e.g. when you’re trying to start a .class file: if you receive the error alert java.lang.UnsupportedClassVersionError, you know it comes from the version sector describing the version of Java with which the file cooperates.

On the other hand, if you work in Android, you must remember about optimizing the code as such: you should limit the number of imported libraries to a minimum, and if there are any unexpected problems, such as exceeding the number of methods in the file, then, knowing that the .dex file contains all the compiled classes, including libraries, you can consider two solutions – removing some libraries or optimizing the code.
There are many other situations in which the awareness of the differences between .class and .dex files is important. They usually turn up while you’re working.
Share this article: