How AI and figma MCP changed the way I build frontend in large-scale projects?
Frontend development is mostly about working with code – but not always in the most creative way. Instead of focusing on application logic or interactions, we often spend hours replicating Figma designs: font sizes, spacing, and colors. On top of that, we need to dig through UI library documentation to find the right component and manually adapt it to the design system.
Thanks to Figma’s Model Context Protocol (MCP) and AI tools like Cursor, this process can be significantly shortened. In my case, even on the very first try, the difference was huge: the AI automatically suggested the right Material UI components, generated styles and layouts, and my role was reduced to polishing the details.
In this article, I’ll show what this approach looks like in practice: from configuring Figma MCP, through automatic generation of React/TypeScript components, to reflections on how AI is already reshaping a frontend developer’s daily workflow. Importantly, I use this approach daily in a large-scale production system (over 70,000 lines of code), which proves that AI is not only useful for rapid MVP prototyping, but also for advanced enterprise projects.
Table of contents
What is MCP?
The Model Context Protocol (MCP) is an open standard that gives AI models access to external tools and data. In practice, this means that instead of dumping entire project files or documentation into a prompt, we can expose “MCP servers” – small intermediary services that return structured, precise context. Communication usually happens over HTTP or SSE, and in Figma’s case, the server runs locally within the desktop app.
Configuring Figma MCP
Setting up Figma MCP is very straightforward – just two steps:
- Enable the MCP Server in Figma
- Make sure you’re on the latest version of Figma Desktop
- Open any design file
- Go to Figma → Preferences → Enable local MCP Server
- You’ll see a confirmation at the bottom of the screen that the server is running locally
- Add the MCP Server in Cursor
- Open Cursor → Settings → MCP
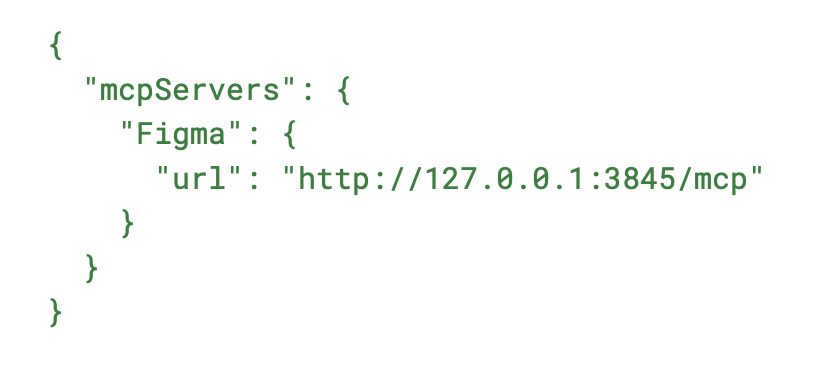
- Click + New MCP server
- Paste and save the following configuration:
Using MCP in Practice
From now on, you can pass Figma designs as context to AI in Cursor in two ways:
- Selection-based – select a frame or layer in Figma, then ask Cursor to help you implement that specific element.
- Link-based – copy the link to a frame/layer in Figma and paste it into your prompt; AI will reproduce the design based on the URL.
MCP provides several tools, including:
- get_code – generates component code from a selection (React, Vue, HTML/CSS, etc.)
- get_variable_defs – returns variables and styles (colors, spacing, typography)
- get_code_connect_map – maps Figma elements to code components if Figma Code Connect is configured
- get_screenshot – generates a screenshot of the selected fragment
- create_design_system_rules – produces design system rule files
- get_metadata – returns XML with layer properties (IDs, names, types, positions, sizes)
A Practical Example
Design
To illustrate how MCP works, let’s implement a notification menu component.

Prompt
Implement <selection-link> component. Make it look 1:1 as it looks in Figma, it should be exactly the same. Write only professional styles, forget about !important, avoid absolute positioning where possible etc. Use MUI components. Use design system defined in @theme.ts. Place all the code in ./components/notifications directory.
Model Results
I used two state-of-the-art models: GPT-5 (OpenAI) and Claude Sonnet 4 (Anthropic).
Both generated code as logically separated components (NotificationItem, NotificationMenu, NotificationHeader). Importantly, the AI correctly pulled in Material UI components (e.g., Popover), ensuring proper HTML semantics and accessibility out of the box.
What worked immediately:
- Correct use of MUI (no unnecessary wrappers)
- Component structure aligned with project logic
- Consistency with our design system (theme.ts) – most spacings and colors were token-based
- Interactivity – the component wasn’t just static HTML: AI prepared callbacks (onSettingsClick, onNotificationClick, onMarkAllAsRead), and tabs already filtered notifications between sections
What needed adjustments:
- Spacing – some margins were off by a few pixels
- Tabs – filtering worked, but UI needed polishing
- Styling details – e.g., icon and text alignment for pixel-perfect match
Final Result
After about 20–30 minutes of manual tweaks, I had a ready, production-quality component: pixel-perfect, fully interactive, and aligned with the project’s design system.
Comparing to the Traditional Approach
Without MCP and AI, this implementation would have taken several hours – mostly spent copying spacing, checking font sizes, writing tab logic, callbacks, and searching through MUI docs.
With MCP + AI, the process looked like this:
- ~5 minutes: generate the first version
- 20–30 minutes: manual fixes and refactor
- Total: <1 hour instead of half a day
Challenges and Concerns with LLMs in Frontend
Like any tool that automates developer work, LLMs raise questions about quality and risks. I had similar doubts at first:
Will the generated code be poor quality?
- Concern: “AI will create spaghetti code no one wants to maintain.”
- Reality: quite the opposite. The code was split into clean components, used MUI properly, and applied our theme. This worked because AI had project context (e.g., theme.ts, existing components).
Can AI handle all types of UI?
- Not always. It’s excellent for static and repetitive components – cards, lists, layouts, simple modals.
- But for highly interactive elements (drag & drop, custom animations, unique behaviors), it often struggles. In those cases, treat AI’s output as a starting skeleton, not a finished feature.
How to keep consistency with project best practices?
- Cursor helps here. The IDE indexes the project and gives the LLM context (folder structure, existing components, theme files, even tests). This ensures generated code fits the repo’s style and avoids duplication.
When to use AI vs not?
- Use AI: new screens from Figma, repetitive components, when speed and style consistency matter.
- Don’t rely on AI: critical business logic, complex interactive features.
Conclusion
AI in frontend isn’t replacing developers anytime soon – but it’s already an excellent assistant. It takes care of repetitive tasks, helps us move faster from mockup to working component, and frees us up for what matters most: conscious engineering decisions.
Experiments are ongoing, and the market is evolving rapidly – what’s cutting-edge today may become standard tomorrow. At Boldare, we share these learnings within our Next Gen Guild, where we test AI tools in practice and exchange insights in real time. I highly recommend this approach to any team – it’s not just about using the technology, but about building knowledge together and learning continuously.
Share this article: