Build better digital products with user story mapping
Any design or development project needs a clear idea from the start of exactly what is being built, and why. For any application this ‘clear idea’ could easily be a long list of requirements - a static, rigid list of specifications for the project. However, with the fluid nature of the digital world, most software projects benefit from some flexibility – they need to shift their focus in response to new information, user requirements or business needs. Hence our use of the agile scrum methodology. User story mapping is a technique to break down all the mentioned requirements into prioritized steps in the development process. It helps to map the connections and dependencies between all the software pieces.
Table of contents
There’s a reason that user story mapping is a key part of our standard product discovery workshops – we use it as a non-static way to explore and understand exactly what the product under development is intended to achieve; still leaving us the freedom to pivot when necessary.

What is user story mapping?
First, what are user stories? User stories are short descriptions of your digital product’s features from the perspective of the person who will be using that product. A user story has three key elements: the desired feature, the type of user, and the purpose or benefit to the feature; they often follow a version of the following template:
“As a (type of user), I want (feature), so that (benefit to user).”
In other words, each user story gives us the what, who and why of each product feature. Before we get to the mapping part, let’s just clarify that each user story must:
- Clearly identify the “user” – what are their role/lifestyle/responsibilities/etc relevant to the product.
- Provide sufficient detail – enough to provide clarity but not so much that the user story starts laying down what the solution is or how the feature should be designed and delivered.
- Prompt a discussion – user stories are the beginning of a focused discussion; in fact, one of the big benefits of user story mapping is the conversation it provokes, essential in the early stages of the project to better understand the product being developed.
And now, to the mapping part!
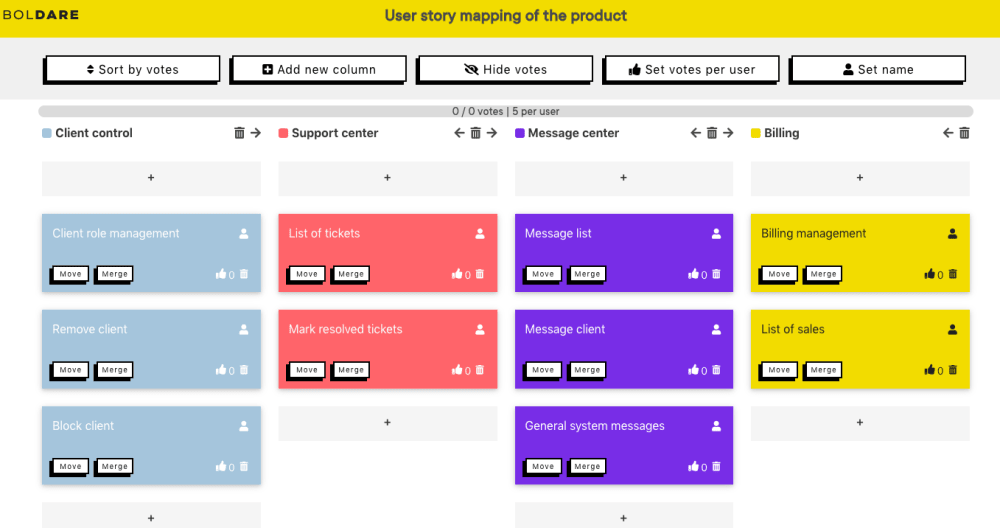
The technique of user story mapping was introduced by Jeff Patton in 2005. A simple story map is a grid layout in two dimensions. From left to right, the high-level stories (sometimes called ‘epics’) are laid out, covering the major features and stages in the user’s journey when using the product. Moving vertically downwards, other, finer detail stories are added. In other words, the further down the layout you go, the smaller and more specific the story.
As a 2D visual representation of the whole project, a user story map acts as a visual summary of the experience users will have with your product, laid out in such a way as to make prioritizing easier (the layout makes it simple to see which stories are related to others, and which groups of stories should be worked on in the same sprints to create the next product iteration. It’s also easy to change as circumstances change – in that sense, a user story map is a living, evolving (and agile) document.
A story mapping process
An average user story mapping exercise might take place in a workshop environment and involves several people (ideally including the whole project team and the product owner from the client side) with a lot of sticky notes. Equally, story mapping can be done remotely, using video-conferencing and screen-sharing tools or apps such as Boldare’s Sprint Retrospective Tool. Either way, the basic process is as follows:
- Frame the problem – Let’s be clear on the exact problem or issue the product is intended to solve for users. Similarly, what key business objectives is the product expected to support? What are the overall goals?
- Understand the users – Who is the target audience for the product? What are the main ‘user personas’ central to your design. You need clarity on exactly who the product is aimed at, and who it isn’t.
- Map out the high-level user stories – Brainstorm every activity likely to be carried out by the various users; each interaction with the product? What can those users expect from the product and what do you (or the product) need from them in order to deliver? These stories are the that first horizontal line, across the top of the grid.
- Map the lower level user stories – Under each story on that first, top line, add the smaller activities or interactions; by doing so, you’re effectively breaking down each high-level story.
- Prioritize – Now order (or re-order) the grid so that under each high-level activity, the lower level stories are ranked in descending importance. This layout gives you a clear view of the route each user’s journey takes from left to right on the map. By tracing the different user journeys ‘through’ the product, the features and attributes can be prioritized for development.
- Identify the gaps – This ‘big picture’ of the flow fo the various user journeys should make it easier to see where there are gaps, steps or stages that you didn’t spot or think of the first time round. This rounds out the overview of the product, from a user-centric perspective.
- Plan the sprints – You should now be able to agree on the clear priorities – which journeys and features are most important, which deliver the most value in the shortest time – allowing you to group them into logical sprints and product iterations for development.

User story mapping outputs
The main and the most important gain here is the product backlog and a very clear picture of the scope of the work.
Also, the team and stakeholders have better visibility of what the core of the application, which aspects and features are central and which should be treated as nice-to-haves. This helps to keep the focus on the right things, and gives a better understanding of potential costs.


The benefits of user story mapping
We’ve emphasized that user story mapping is a technique that enables you to drill down and create a detailed picture of the product from the user’s perspective. The question is, what project and business benefits do you get from creating such a picture?
- A user story map gives your developers a crystal-clear set of priorities; in fact, it’s a way of managing the project backlog in terms of relative priorities.
- The process of story mapping is entirely focused on the user and is highly suited to user-centered digital product development.
- The map is flexible in that product owners can add or remove stories, or change story details, as circumstances change; including in response to feedback following user testing.
- Project decisions around priorities and features are easier with a user story map as context.
- The more focused approach to deciding on sprints and product iterations means that your project delivers value earlier and more frequently.
- With each sprint resulting in a product iteration, it becomes much easier to plan product releases.
- A user story map illustrates very clearly the links and interactions, the risks and dependencies between tasks and project activities.
- Finally, as already mentioned, the process of user story mapping encourages discussion (in fact, it demands collaboration!), ensuring a deeper shared understanding of the project and product by the development team.
When to use user story mapping?
Arguably, you could usefully run a story mapping exercise at any point in your digital product development project – especially at any point of changing circumstances, or when you need to review and restructure the backlog.
But what should be clear from what’s been said so far, is that the ideal time for a (first) user story mapping exercise is early in the project. That’s why at Boldare, we regularly use this technique as part of our product discovery workshop at the beginning of each project. In this context, user story mapping enables us to take in-depth knowledge and understanding of the client’s business and user needs, and apply that knowledge and understanding to specific design and development activities.

User story mapping – your secret project planning ingredient
Simply put, user story mapping is a method of exploring and identifying all the people who will use the product, how they’ll use it and why. Especially when carried out at the beginning of the project, user story mapping is an effective part of the planning process – at a level above that of sprint lanning – which keeps users as the focus of your priorities and planning decisions.
Not only does the user story mapping technique fit well with agile methodologies, it also helps keep your project productive, producing a useable iteration every sprint. Maybe we can leave the last words to the inventor of user story mapping:
User Story Mapping is a dead simple idea. Talk about the user’s journey through your product by building a simple model that tells your user’s story as you do. It turns out this simple idea makes working with user stories in agile development a lot easier.
Jeff Patton
Share this article: