IoT begins at home
IoT is a domain of various appliance manufacturers, although technologically speaking, it’s still a pioneer field. I’d never thought that I would ever dabble in electronics, even as an amateur and yet life shows that necessity is the mother of invention. That was also the case with me as it turned out, I had to construct a driver to use the phone as a remote control for the heating boiler that supplied heat to a single-family house.

Table of contents
How it’s made?
This article describes a journey I went through to build a driver using simple components and to program it based on Java 8, Raspberry Pi Zero W, WebSockets, Spring Boot, REST, and Pi4J. Perhaps my method will inspire you to build something of your own.
It all started with a simple wall driver that controls the boiler I have at home. Theoretically, the system works well, however, the driver is quite primitive and it only allows you to program one level of temperature of heating for the entire day. But what if I am not home for a longer period of time in winter?
IoT - my own remote control heating system
According to the manufacturer, it looks like I could:
- keep the heating on all the time and get an enormous gas bill (not to mention the air pollution I’d create and my impact on global warming);
- forget about the heating at all, return to a half-frozen house and not once back from holidays, spend several hours wrapped-up in a blanket waiting for the house to defrost.
None of the options above seemed good enough or even reasonable to follow, therefore I was forced to do something to solve the problem.
Choosing the technology
I wanted to buy a better driver that would allow me to remotely control the boiler through the phone. However, I was disappointed very soon, due to 2 reasons:
- There aren’t many plumbers who are able to install this kind of driver and those who can charge a lot of money for that;
- The drivers available on the market only enable you to turn the boiler on at one temperature level. More complex devices are unfortunately too expensive.
Having that in mind, I decided to build a driver on my own.
Computer and programming language
First, I had to find a proper computer to control the boiler. It looked like Arduino and Raspberry Pi were the only machines that would fulfill my needs. However, since I am a Java developer and I would have to learn C++ programming to use Arduino, the choice narrowed down to Raspberry Pi Zero W, that is not only small but also has enough processing capacity to run a Java Virtual Machine on it.
Building the driver
As a huge do-it-yourself fan, I decided to buy a copper plate for etching, etch and an old GSM modem. Luckily, I managed to find them all in local shops and the remaining elements such as rectifier diodes, a control coil, DS18B20 temperature sensor, and RTC DS3231 real-time clock – were ordered via AliExpress. AliExpress normally has longer delivery times but is much cheaper and I wasn’t in a hurry.
After a few weeks of building and testing, a complete electronic system was finally ready to rock (photo below). I agree it might not look very impressive, but for a novice like me, it’s really something to be proud of. And it works!
I used a 16GB (Class 10) microSD card as the hard disk for Raspberry Pi and Raspbian Jessie Lite as the operating system.

Connecting and timing
Once the operating system was installed, I started the 1-Wire interface that enabled reading the temperature from the temperature sensor. Then, a very important step, I configured the RTC. Raspberry Pi doesn’t have a powered RTC, so each reboot means resetting the date in the computer. Having that ready, I started the GSM modem thanks to a program available at sakis3g.org.
The driver app
I made up my mind to write the server application, running on Raspberry Pi, in Spring Boot, so that the REST API would allow me to update the status of the driver.
The data is saved in the config.json file, which contains all the settings. You turn on and off the boiler by means of closing potential-free contacts in the boiler using the coil. For safety reasons, the boiler is connected to the coil as an open circuit. You control the coil from your app by setting adequately the high or low mode on the output pins in Raspberry Pi. To do this, I used the Pi4J library.
I also designed the PCB using the free version of EAGLE – this program lets you design a 10x10 cm board completely free of charge.
Android app

In order to make the system work the expected way, a client application must to provide with a constant control over the heating system.
Requirements for the Android app:
- The app should be able to set a particular temperature for a particular hour and a day of the week;
- My application should have a simple dashboard so that the driver would show me the current time, the temperature inside the house, and the temperature outside;
- The new app should also make it possible to pause the heating and to do it quickly.
After several weeks of working, it had finally happened - the app was ready to use. From the technical point of view, the idea was to make an Android app which would generate a config.json file containing all the settings for the boiler, and have it sent through REST API to the Java application running on Raspberry Pi. This shows how the communication was initially supposed to work:

It didn’t all go the way I expected
The first tests demonstrated that the Android app was unable to connect to Raspberry Pi with Internet connection through the GSM modem. Unfortunately, you cannot place a server on the GSM modem (the server constantly gets a new IP number), and besides, the server is behind the GSM operator’s NAT. Placing a VPN server on Raspberry Pi didn’t seem to work, either, as it failed to connect to it.
Teamwork matters
Boldare is a place where we put a lot of emphasis on teamwork and ideas-sharing. That doesn’t only refer to the work, but also to the everyday struggles. At breakfast, I spoke about my project and the blocker I encountered. To my surprise, one of my colleagues came up with a great solution that could really solve my problem. “If the world cannot connect to the server, let the server connect to the world” he said, inspiring me to try again, but this time using WebSockets.
In order to achieve it, it was necessary to create a third app that would work as a proxy between the driver and the Android app and make the proxy server available at a fixed address.
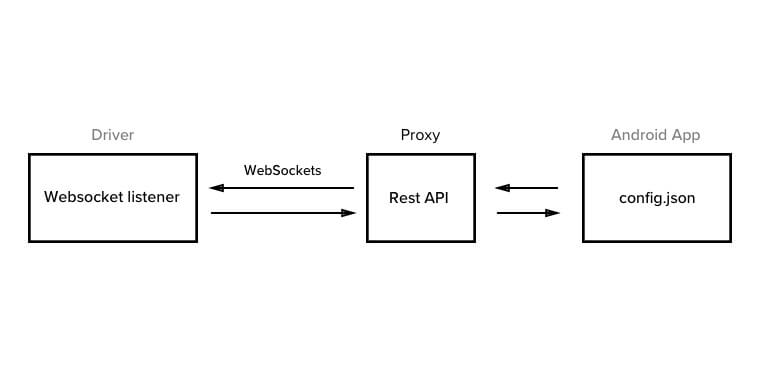
Proxy, it’s an app written in Spring Boot and running on an AWS server with a fixed IP address. The proxy server is at the same time a WebSocket server, and the app running on Raspberry Pi is its client. Every time the driver is started or restarted, the WebSocket client registers the activity on the server and awaits alerts. What’s best is that thanks to this configuration, the floating IP or IP addresses translation taking place behind the GSM operator’s NAT is not an obstacle.
Bingo! Everything works the way it should.
Communication
Every time the boiler settings are changed through the mobile app, a PUT request is sent to the proxy, containing the new settings. Next, the proxy server sends an alert (through WebSocket) to the driver, informing it that there is a new configuration for the boiler. Once the message has been received, the driver downloads the new settings by itself, sending a GET request to the proxy in order to do it.
Reading the temperature
Reading from the driver works in a similar way to updating the settings. The Android app sends a request to the proxy, asking it to provide the driver status and the temperature inside the house. Through WebSocket, the proxy connects to the driver in order to download the data on the condition of the boiler and the temperature at home.
After a second from the sync request, the Android app sends a request to the REST API proxy asking if the proxy has the latest status of the driver. If so, it downloads the data.
Whether not, the Android app waits another second and repeats the requests. If the third attempt fails too, the user receives a message informing about data downloading problems from the driver.
Optimization
All the alerts are packed with gzip, what helped limiting the data transfer and minimised the size of transfered data from 13.6 kB to about 1kB per message. To avoid negative voltage while switching the coil and to prevent potential disturbances of Raspberry Pi, the coil in the driver has a separate power supply, moving through the rectifier diodes of the maximum voltage of 400V.
Finally, to limit the number of saves on the SD card and prolong its lifespan, I configured tmpfs for the following folders:
- /tmp,
- /var/log,
- /var/tmp,
- /var/cache/apt.
The data from the temperature sensor is saved in a virtual file system (/sys), so there’s no need to use tmpfs.
Summary
Internet of Things is a great trend in technology and, as it appears, large companies invest billions of dollars in IoT-related projects. What’s important here is not to losing sight of the most significant issue – the customers’ needs.
Moreover, building the driver had thought a lot of new things I have realized that programming experience can sometimes come in handy in everyday life and that normal people like you and more can take advantage of rapidly growing technology and use it to improve our lives.
As to the driver, I’m currently testing it and introducing some improvements to it.
I’m also planning to implement the function of controlling the driver and sending JSON messages by means of texting.
What about you? Have you ever had a chance to create something of your own?
Share this article: