

Performance in React (React lifecycle)
One of the greatest strengths of the React library is its performance level. This technology is actually as quick as a flash. Such a state of affairs can easily change, though, and just a few bugs can significantly slow down the functioning of a created application. That’s why I’d like to discuss a couple of popular and effective tools to diagnose performance problems. I hope this text will help you make your React app code better.

Table of contents
Let’s start from the beginning – why is the speed of an app so important? Obviously, this factor affects your experience when using the app, but in business, it may have more tangible effects. Even a minor slowdown in the app’s or page’s performance can cost your organization lots of money.
The chart below shows how load time changes can decrease the sales and the number of visitors in the case of three big websites.

Below you can find the methods of React code optimization that I find most interesting.
React DevTools highlight updates
One of the useful tools which can help you optimize React code is the browser extension React Developer Tools (for Chrome, Firefox, and Opera). It shows you which code elements in particular are being updated. After installation, you can simply open a project and then go to Chrome Developer Tools. There, find and run the Highlight Updates method, which highlights the updated components. You can see it in this example:
Minor neat fix in React 16: “Highlight Updates” in React DevTools now works as expected and skips PureComponents that bailed out. pic.twitter.com/2kEKJCUToE
— Dan Abramov (@dan_abramov) September 29, 2017
Performance timeline
React Profiler is another functionality included in React Developer Tools. It collects data about what processes the app is running when someone is using it. Thanks to the collected data, you’re able to learn how much time the app has spent on rendering and updating the used components. There’s also a very interesting graph which shows you how much time has been spent on script execution, rendering, displaying the site’s components, idle periods, and other actions.

If you want to find out more about using Performance Profiler, take a look at the article introducing the React Profiler.this article.
Wasted Render Cycles
Some of the most common problems affecting performance in React are the unnecessary render cycles. They occur when a component is re-rendered even though nothing has changed in it. To stop a component from re-rendering, one of the following must happen:
- state or props in the component are changed,
- parent component is updated,
- a component update is forced, using the method forceUpdate()
When one of the actions above takes place, one of the component lifecycle methods is started: shouldComponentUpdate(). In that case, React decides whether the component should be re-rendered or not. If you don’t implement the method shouldComponentUpdate, the component is rendered each time, as a default action.
This is how implementation of this method it looks in practice:
 shouldComponentUpdate() {
   return true;
 }
After executing the shouldComponentUpdate method and returning true, the component is re-rendered. The entire component update cycle ends with the ComponentDidUpdate() method call. Below is a graphic that illustrates all methods of the component’s life cycle.

Why Did You Update
This small library detects unnecessary re-rendering of the components. Why Did You Update will display in the developer console information about the components that have been re-rendered, while these components should not be re-rendered because the props or state attributes have not changed.
Setup
It’s not difficult to implement this library. To do this, install Why Did You Update as a development dependency (devDependencies):
npm install --save-dev why-did-you-update,or
yarn add --dev why-did-you-update.Next: add the piece of code below to your app.
import React from 'react';
if (process.env.NODE_ENV !== 'production') {
   const {whyDidYouUpdate} = require('why-did-you-update');
   whyDidYouUpdate(React);
}
Important: after adding this library to the project, you may notice a decrease in the app’s performance. This is a normal situation: Why Did You Update checks whether the previous states and props differ from the updated ones. That’s why this library shouldn’t be used in production, as it considerably slows down the app’s performance.
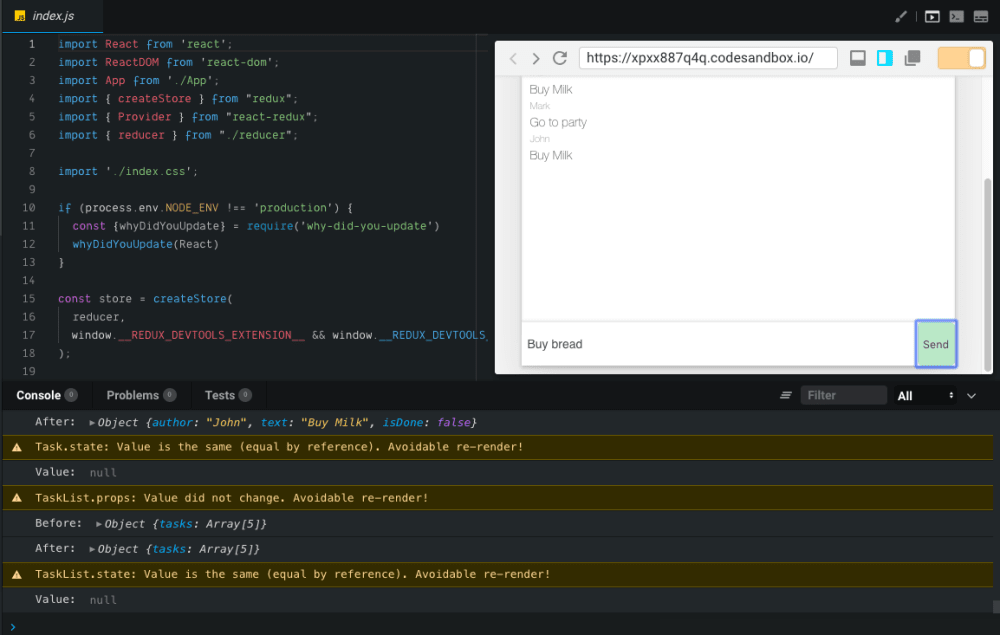
This is an example of logging information about avoidable re-rendering into the console:

React Developer Tool – a handy helper
This will show you how a given solution works in practice, on real code. This link will take you to a simple app which creates to-do lists. It contains input for writing the tasks, but they can’t be added to a list. In the console, you can easily see that the components are re-rendered unnecessarily when something is written in the app (state or props didn’t change for TaskList or Task component). How to optimize that?
To give you a better picture of this problem: exchange simpleState for complexState in reducer.js. This will highlight the problem and make it easier to recognize. In this case, it will be a good idea to use PureComponent instead of the regular Component.
What does PureComponent give you?
By default, PureComponent contains the implementation of the shouldComponentUpdate method with a shallow comparison of props and state. That means that a component won’t be re-rendered if props and state don’t change.
Note: this is the “shallow compare” method, which means that any time an object is passed as props, the component will be re-rendered. “Shallow compare” is not able to verify if something has changed in an object, it only checks the object’s references in the memory.
Let’s now try to change the TaskList component into PureComponent. Thanks to that, there will be no more unnecessary re-renders in the Task component. For now, there’s also no need to do anything about the UserBar component. After switching to complexState, you will see that the app is functioning much better and smoother.
This simple change from TaskList to PureComponent significantly improves the speed of the app – thanks to PureComponent. However, you need to make sure you don’t overuse this component in your projects. Paradoxically, overuse may affect the app’s performance, because PureComponent compares the previous props and state attributes with the new ones. If you use this component in too many places, it will backfire. The app will slow down due to the longer list of tasks that must be performed.

This helps you get rid of unnecessary re-renders in the Task component. After switching to complexState, you can see that the app reacts in real-time to writing and other actions.
Passing a function as props
Another action that can slow down the React apps’ performance is saving too much information in the child component. It may happen that you pass information to a component which won’t ever be used. This is often the case when you pass a whole object of data, for example:
const Person = {
   id: ‘1’,
   name: ‘Jack’,
   code: ‘123’,
   age: 32’,
}
In the example above, you only need the id and the name. It’s a good practice to add only the information which is really required by the component and to do it as flat as possible, i.e. by avoiding nesting in objects or tables.
An example of using a props as a method:
The parent component contains the Person object with 10 fields. The child component needs only two fields. You can create a new object with these fields (dataForShowSmile) and pass the two pieces of information in one props attribute or divide the information into separate props.
const Person = {
   firstName,
   lastName,
   phone,
   email,
   age,
   comments,
   posts,
   address,
   country,
   createdAt,
 }

 const dataForShowSmile = {
   age: Person.age,
   name: Person.firstName
 }

<ShowSmile data={dataForShowSmile} />

<ShowSmile age={Person.age} name={Person.firstName} />
Functions can also be optimized. For the correct performance of the methods created in the class component, you need to bind them or build them as an arrow function.
Below, you can see several methods of binding this to correctly indicate the given component.
Function binding or arrow function creation in the render method are not good ideas. Every time a component is re-rendered, you create a new function instance. Theoretically, it’s a trifle. In practice, with a large number of elements on a list, this will influence the app’s performance considerably.
Example below: creating an arrow function in the render method:
class Future extends React.Component {
 renderUpdatedFuture() {
   // return complicated methods to update future
 }

 render() {
   return (
     <button onClick={() => this.renderUpdatedFuture()}/>
   );
 }
}

Write inline function in render method
class Future extends React.Component {
 render() {
   return (
     <button
     onClick={() => {
       /* write inline complicated methods to update future */
     }}
   />
   );
 }
Function binding in the render method:
class Future extends React.Component {
 renderUpdatedFuture() {
   // return complicated methods to update future
 }

 render() {
   return (
     <button onClick={this.renderUpdatedFuture.bind(this)}/>
   );
 }
}
To handle this issue, you just need to bind the method in the constructor. Then, with every subsequent re-render, you refer to the same place in the memory.
Another alternative is to create an arrow function, then you don’t change your reference to this.
class Future extends React.Component {
 renderUpdatedFuture = () => {
   // return complicated method to update future
 }

 render() {
   return (
     <button onClick={this.renderUpdatedFuture}/>
   );
 }
}
Creating this method as an arrow function and passing its reference to the onClick method looks like this:
class Future extends React.Component {
 constructor(props) {
   super(props);

   this.renderUpdatedFuture = this.renderUpdatedFuture.bind(this);
 }
 renderUpdatedFuture() {
   // return complicated method to update future
 }

 render() {
   return (
     <button onClick={this.renderUpdatedFuture}/>
   );
 }
}
Here you can read more about passing methods to components.
Functional vs. Class Component
Before the React update to version 16, there was hardly any difference between the performance of functional and class components. The functional components were converted into class components by React. The only thing you saved this way was the smaller amount of code.
In version 16, this changed. Functional components have a different building path to class components now, which makes them faster in action. The difference is not large, but as you develop your app, the number of components is continuously growing, so even the slightest change may be perceptible.
“Classes are hard for humans and machines”
Sophie Alpert
React Conf 2018
Functional components take up less space in the app code than class components with the same functionalities. A smaller bundle file means a quicker download, which makes the app ready to use sooner.
Connect vs. Passing Props
This is also a very interesting topic – is it better to pass props through parent components or is it better to connect with another component to the store? In your app, you have the parent component which is already connected to the store. You have a ready component to display the task list. Now you want to view all the tasks by passing that information to the Task component.
Let’s analyze two different ways of solving that problem.
One of the possible solutions – the one which has been used in this app – is to take all the tasks out of the store in the parent component and pass them to the child component as props. If you don’t secure them in the child component, you may end up with unnecessary re-renders.
Another solution is to connect the Task component to the store and retrieve the data there. The next step would be to create a component which is connected to the store and retrieves particular tasks. To do this, you need a well-constructed store and data normalization.
Are you wondering if connecting too many components to the store will lead to a slowdown in the app? Wouldn’t it be better to pass the data by means of props? It depends. I recommend you to have a look at connect implementation. It turns out that it doesn’t perform any complicated actions and is more cost-efficient than the unnecessary re-rendering of components.
“In fact, benchmarks have shown that more connected components generally lead to better performance than fewer connected components.
In general, try to find a balance between understandable data flow and areas of responsibility with your components.”
Quote: Redux documentation
Maintain the flat state. State normalization
I’m sure you’ve frequently encountered a situation when there’s a lot of nested data in an app, with even more nestings which develop more nestings, and so on. To give an example, this may refer to an app which has a user list where every user can write multiple posts and comments on posts. The structure may get a little complicated here.
So, let’s now talk about the structure of the data you use. A common practice is using an object table. You can do it two ways:
Array-Based Storage
task = {
 id: task1,
 title: ‘First task,
 description: ‘Lorem ipsum…’,
}

tasks = [
 task,
 task,
 task,
]
Object-Based Storage
tasks: {
  task1: {
   id: task1,
   title: ‘First task,
   description: ‘Lorem ipsum…’,
   },
  task2: {
   id: task2,
   title: Second task,
   description: ‘Lorem ipsum…’,
 },
}
What are the pros and cons of these solutions?
They simplify the performance of some operations on the data and free the CPU from redundant counting when, for instance, you want to update some data. In array-based storage you go through the whole table to change one element. This is an example of such a functionality:
const updateTaskById = (action) => {
   return state.map(task => {
     if(task.id === action.id){
       //updating data
     }

     return item
   });
 }
Everything is fine as long as there aren’t too many elements in the code. But what if this number is growing, up to a few thousand of elements in the table? You can’t overcome the complexity of these calculations, and that may affect the app’s performance.
You can read more about Big O notation in the linked article.
What if you use the object-based storage method?
You will only refer directly to a given object if you know its key.
const updatedPost = {id: 2, ...}

return {...state, [updatedPost.id]: updatedPost}
What we’ve just done is state normalization. The smaller number of operations increases the performance of the app. What’s more, the app needs less memory space. Maintaining the flat state in the future will not affect the quality of the app and you will not have to change the data structure to make it work faster.
Performance in React.js - a Summary
Before optimization, you should check the speed of your app by means of WDYT and React Profiler. They will help you find out which components need optimization, which will be of use when you actually start optimizing the app.
When you write an app, it’s a good idea to adopt a particular code writing style from the beginning, to include micro-optimization in the process. It won’t add any more work, but the code will be better. You can use various linters here (e.g. ESLint), thanks to which your environment will detect the breach of the pre-set rules and show you where exactly the code must be fixed.
Performance is very important – but, paradoxically, as you work to improve it, you may in fact slow down your work. Sometimes it’s better to write a functioning app and improve its performance afterwards than to spend time on that aspect from the very beginning and, by constantly trying to enhance the performance, end up not finishing the app.
Optimization in React is a very broad subject. Fortunately, it’s been comprehensively covered and documented, so don’t hesitate to read more about other methods as well:
- Virtualizing lists
- Caching application and data with service workers
- Lazy loading components with React Lazy and Suspense
- Memoizing functional component with React Memo
- Memoizing computing derived data and methods with reselect
- Check bundler sizes and optimize them
Share this article: